Creating Banners
Build the consent banners visitors see on your website — choose a template, customize content, buttons, categories, languages, and consent mode.
A banner is the consent UI your visitors see on your website. It tells them what cookies you use, lets them accept or reject each category, and records their choice. Banners are managed under Consent Management → Websites → Banners in the portal.
You can create as many banners as you need. Different banners are typically used for different regions or compliance frameworks (for example, a GDPR opt-in banner for EU visitors and an opt-out banner for California visitors). Once you've created your banners, use the Configuring Banner Rules page to control which banner is shown to which visitor.
Two-layer designEvery banner has two layers. The first layer is the compact prompt a visitor sees on arrival ("We value your privacy", Allow All / Reject All / Customize). The second layer is the detailed preferences view where visitors toggle individual cookie categories. Most visitors only interact with the first layer; the second layer is opened by clicking Customize.
Creating a banner from a template
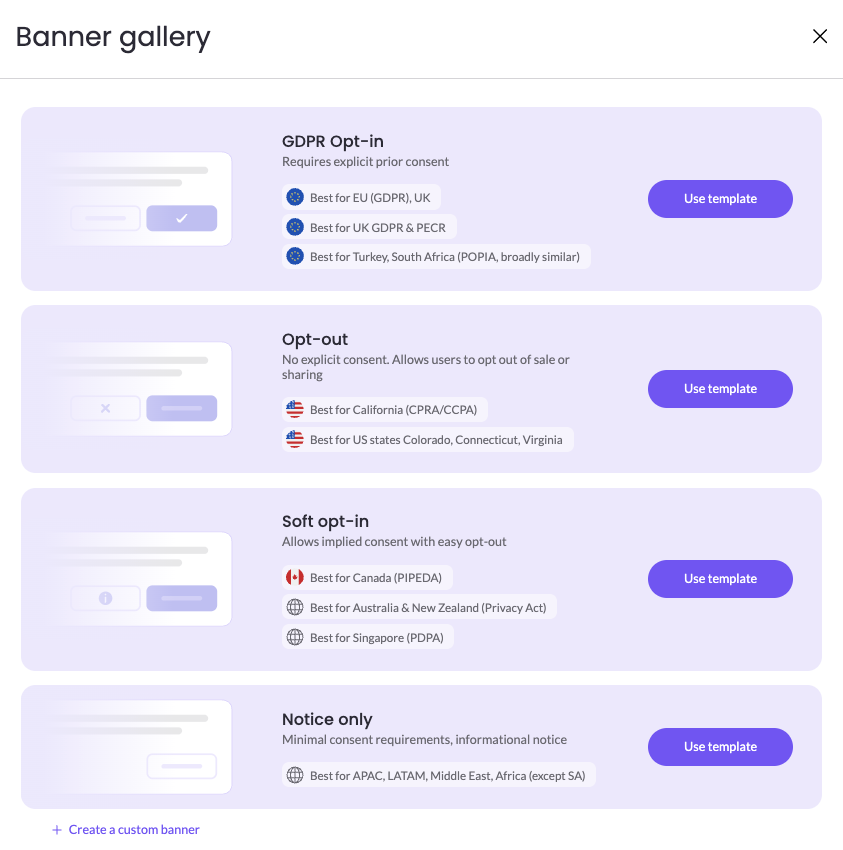
When you create a new banner, MineOS offers a Banner gallery with starter templates aligned to common privacy frameworks. Each template comes pre-configured with the right consent mode, button set, and category defaults — you only need to customize content and branding.
| Template | Consent behavior | Best for |
|---|---|---|
| GDPR Opt-in | Requires explicit prior consent — cookies are blocked until the visitor accepts | EU (GDPR), UK GDPR & PECR, Turkey, South Africa (POPIA, broadly similar) |
| Opt-out | No explicit consent required — allows users to opt out of sale or sharing | California (CPRA/CCPA), US states like Colorado, Connecticut, Virginia |
| Soft opt-in | Allows implied consent with easy opt-out | Canada (PIPEDA), Australia & New Zealand (Privacy Act), Singapore (PDPA) |
| Notice only | Minimal consent requirements — informational notice | APAC, LATAM, Middle East, Africa (except SA) |
To create a banner:
- Go to Consent Management → Websites, open your website, and select Banners.
- Click to open the Banner gallery.
- Pick the template that matches your target region and click Use template, or click + Create a custom banner to start from scratch.
- The banner editor opens with six tabs: First layer, Second layer, Buttons, Cookie categories, Languages, and Consent options.
You can rename and edit any templateThe template name (e.g. "GDPR Opt-in") is just a starting point. Click the pencil icon next to the banner name at the top of the editor to rename it. Every setting in every tab can be changed later.
First layer
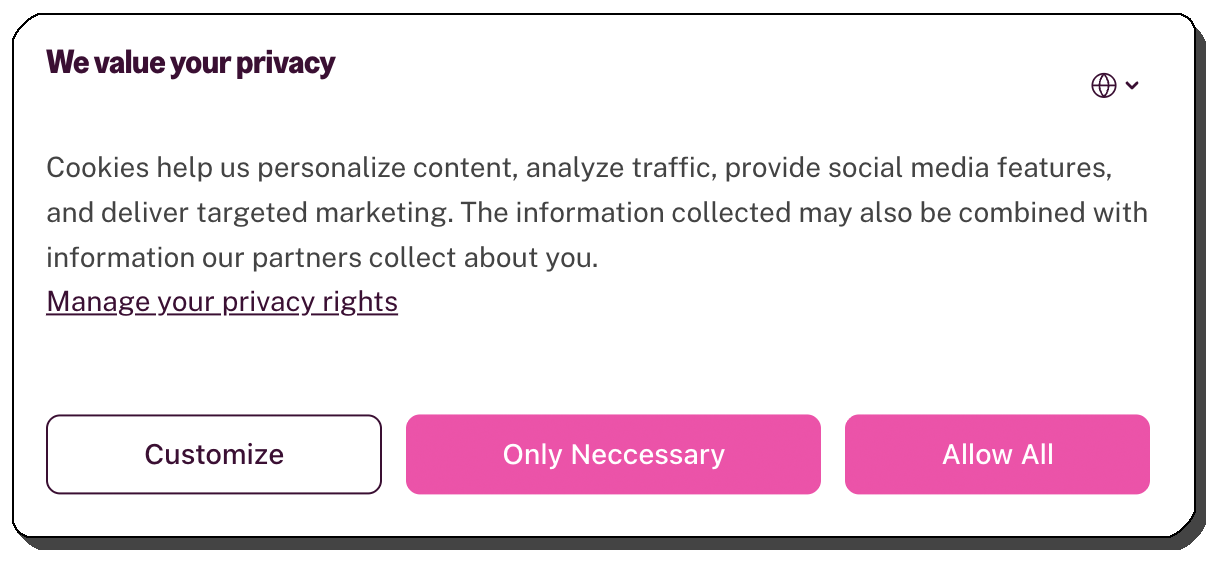
The first layer is the initial prompt visitors see. The First layer tab controls its content and layout.
Title — The headline shown at the top of the banner (e.g. "We value your privacy").
Message — The body text. A rich-text editor lets you add bold, italic, links, lists, headings, and other formatting. Use this to explain why you collect cookies and link to your privacy policy.
Categories — A toggle called Allow category-level selection. When on, the first layer shows the four cookie-category toggles directly (Essential, Functional, Analytics, Marketing) so visitors can choose categories without opening the second layer. When off, visitors see only the headline buttons (Allow All / Reject All / Customize) and must open the second layer to pick individual categories.
Buttons — Three toggles control which action buttons appear on the first layer:
- Show "Accept all" — One-click consent for all categories
- Show "Opt out of sales" — CCPA-compliant opt-out button (typically only shown on US banners)
- Show "Reject all" — One-click rejection of all non-essential categories
The Customize button is always shown — it's what opens the second layer. Use Edit button titles to change the label on any button (this opens the Buttons tab).
Layout — Choose how the first layer is positioned on the page:
- Bottom banner — A bar pinned to the bottom of the screen, leaves the page interactive
- Dialog — A centered modal that overlays the page until the visitor responds
Some jurisdictions require a "Reject all" buttonUnder GDPR guidance from several EU data-protection authorities, rejecting cookies must be as easy as accepting them. If you're configuring a banner for the EU, leave Show "Reject all" turned on.
Second layer
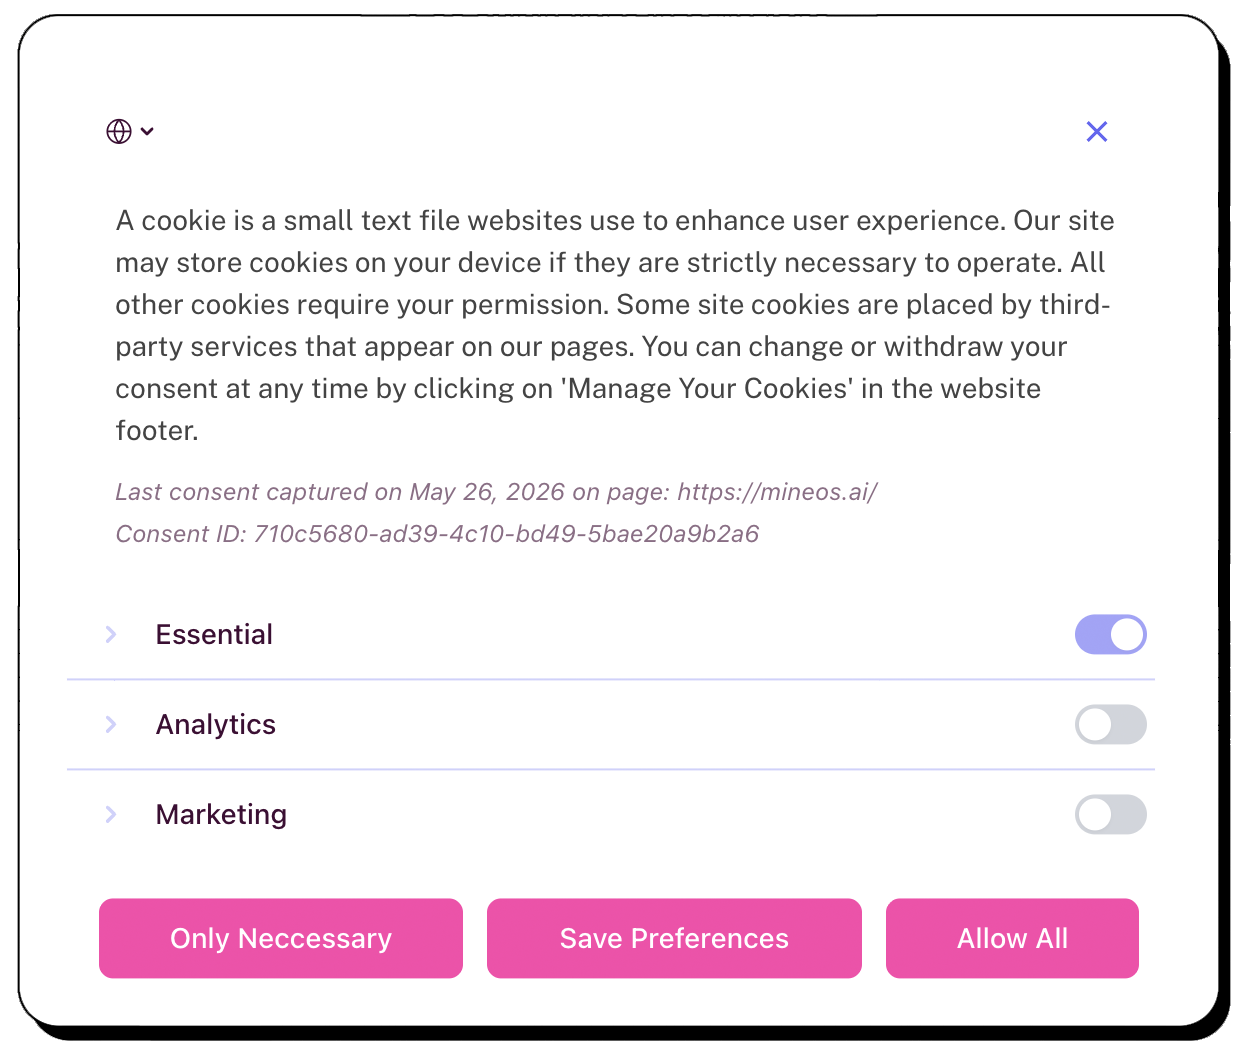
The second layer is the detailed preferences view, opened when a visitor clicks Customize. The Second layer tab controls its content.
Message — A rich-text description shown above the category toggles. Typically a longer explanation of how you use cookies and how visitors can change their preferences later.
Audit — The last consent signal recorded is displayed, together with a unique Consent ID. The Consent ID can be used by you to search the consent audit logs.
Buttons — On the second layer the three buttons are fixed (you cannot add or remove them):
- Only Necessary — Saves consent with only Essential cookies enabled
- Save Preferences — Saves whatever the visitor has toggled on
- Allow All — Enables every category
You can change the button labels by clicking Edit button titles (this opens the Buttons tab).
The four category toggles (Essential, Functional, Analytics, Marketing) appear automatically — visitors switch them on or off and click Save Preferences to confirm.
Buttons
The Buttons tab lets you customize the label of every button used across the first and second layers. The labels apply consistently wherever that button appears.
| Button | Where it appears | Default label |
|---|---|---|
| Options | First layer | Customize |
| Reject all | First & second layers | Only Necessary |
| Accept selection | Second layer | Save Preferences |
| Accept all | First & second layers | Allow All |
Add and remove buttons from the First layer tabThe Buttons tab only edits labels — it can't add or remove buttons from the banner. To turn buttons on or off, go to the First layer tab and use the Show "Accept all" / "Opt out of sales" / "Reject all" toggles.
Use Edit translations at the bottom of the tab to translate each button label into the languages you've added.
Cookie categories
Every banner shows the same five cookie categories, and the Cookie categories tab is where you customize them:
| Category | What it covers |
|---|---|
| Essential | Strictly required for the site to function |
| Functional | Preferences, language, region, and similar settings |
| Marketing | Advertising, retargeting, and conversion tracking |
| Analytics | Traffic analysis and product usage telemetry |
| Unclassified | Cookies not yet categorized |
For each category you can set:
- Display name — How the category is labeled in the banner (e.g. rename Marketing to Advertising).
- Initial selection state — Whether the toggle is on or off by default when a visitor first opens the banner. Essential and Unclassified are always on. For Functional, Marketing, and Analytics, the appropriate default depends on your consent mode:
- For Opt-in banners, leave these defaults off — visitors must turn them on themselves.
- For Opt-out or Soft opt-in banners, you can set them on so cookies load by default and visitors must opt out.
Languages and translations
The Languages tab lets you add every language your website supports. Once a language is added, you can translate the banner's title, message, button labels, and category names into that language.
To add a language:
- Open the Languages tab and click + Add language.
- Select the language and region (e.g. French (France)).
- Once added, an Edit translations link appears at the bottom of the First layer, Second layer, Buttons, and Cookie categories tabs. Click it to open a side panel with the source text and a field for each added language.
Auto-translate — In the translation side panel you can click Auto-translate to generate translations for all your added languages based on the English (or other source) version. You can then review and adjust them before saving.
At runtime, MineOS displays the banner in the visitor's preferred browser language if it's one you've translated. If not, it falls back to the default language.
Always add at least one languageA banner must have at least one language configured (typically English (United States) by default). Visitors whose browser language isn't on your list see the banner in your default language.
Consent options
The Consent options tab controls the underlying consent behavior — what MineOS does with cookies before the visitor has interacted with the banner — and how long their choice is remembered.
Consent mode
Pick one of three modes:
- Opt-in — Cookies disabled until accepted. No non-essential cookies load until the visitor explicitly clicks Allow All or accepts specific categories. Required for GDPR, UK GDPR, LGPD (Brazil), and similar opt-in regimes.
- Opt-out — Cookies enabled. All cookies load immediately. The banner gives visitors a way to opt out. Used for US state laws like CCPA/CPRA.
- Soft opt-in — Cookies disabled until user interaction detected. Non-essential cookies start disabled but are enabled as soon as the visitor interacts with the page (scrolling, clicking, navigating). Used in jurisdictions that allow implied consent.
Consent mode and your banner template should matchIf you started from the GDPR Opt-in template, leave consent mode set to Opt-in. If you started from the Opt-out template, leave it on Opt-out. Changing consent mode without adjusting the rest of the banner can produce a misleading UX (e.g. a banner that says "we'll only use cookies if you allow them" but actually loads them immediately).
Consent expiration
Set how long a visitor's consent choice is remembered. The default is 12 months, in line with common regulatory guidance. After this period elapses, the banner reappears and the visitor is asked to consent again.
Creating multiple banners
Most websites need more than one banner — for example one for EU visitors and another for US visitors. Each banner is a separate object you create and save independently.
Typical setup:
- From the Banners page, open the Banner gallery and pick a template (e.g. GDPR Opt-in). Save it.
- Open the gallery again and pick a second template (e.g. Opt-out). Save it.
- Repeat for any additional regions you need to cover (e.g. Soft opt-in for Canada, Notice only for APAC).
- Go to the Rules tab and create rules that map each region (or URL) to the appropriate banner. See Configuring Banner Rules for full details.
Each banner has its own content, buttons, layout, languages, and consent mode — they're fully independent.
You can also create entirely custom bannersIf none of the templates match what you need, click + Create a custom banner at the bottom of the Banner gallery. You'll get a blank banner with all settings at their defaults, which you can configure tab by tab.
Saving and previewing
The right side of the banner editor shows a live preview that updates as you edit. Both first and second layers can be previewed.
Preview is approximateThe preview shows your banner's content and layout, but font sizes, colors, and exact spacing may look slightly different when rendered on your live website (the banner inherits some styling from your site).
Click Save at the bottom of each tab to commit your changes. Saved banners are immediately available to assign in the Rules page, but they only go live on your website after you click Publish on the website's main page.
Tips and best practices
- Start from a template. Templates come with the right consent mode, button set, and category defaults for each framework — much faster than building from scratch.
- Keep first-layer text short. Most visitors won't read more than a sentence or two. Save the detail for the second layer and your privacy policy.
- Don't hide the reject button. In opt-in jurisdictions, regulators have fined sites where "Reject" was harder to find than "Accept".
- Translate before you publish. Use Auto-translate to seed translations for every language your site supports, then have a native speaker review the critical strings (especially button labels).
- Re-use category labels. If you've renamed "Marketing" to "Advertising" on one banner, do the same on the others so the experience is consistent across regions.
- Test each banner. Use the preview, then assign each banner to a rule and visit your staging site from each target region (a VPN works) to confirm the right banner appears.
Updated 5 months ago